The first and only plugin
for appointment booking for Divi
Everything prepared especially for Divi!
$49.00
Out of stock
The only plugin for Divi that will allow you to:

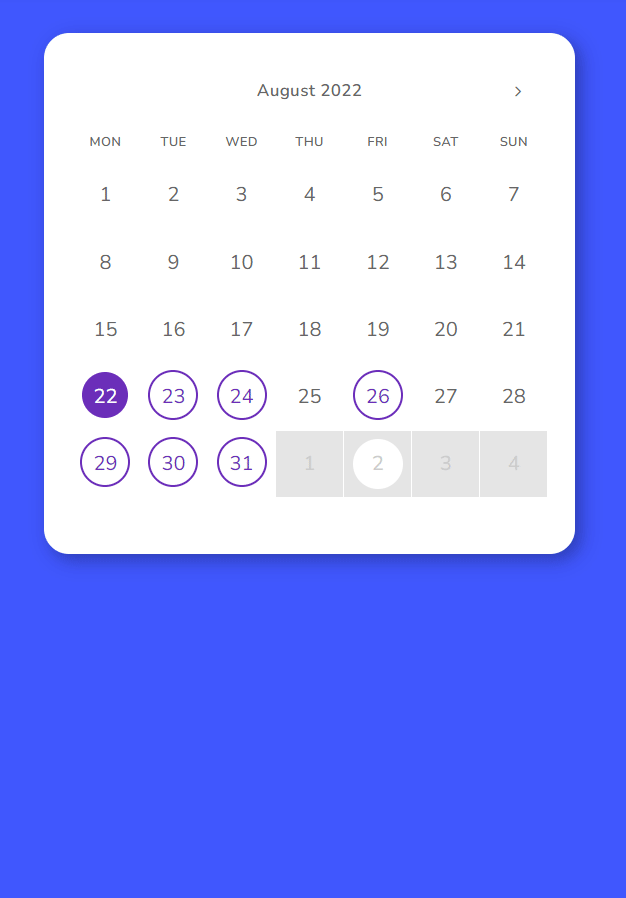
Make appointments
Your clients will be able to book appointments directly from the calendar on your website.
You can set the length of the meetings and the breaks between them.
You will confirm the meeting yourself from the back office.
Thats all! Easy right?
Out of stock
Design your own calendar in the Divi module

You can freely modify virtually any color in the calendar.
Customize the calendar perfectly for your website or service.
Change background, accent colors and fonts.
You are only limited by your imagination!
Out of stock

Add unlimited numbers of appointments forms on your site
You can add an unlimited number of calendars on your website.
Create a separate calendar for each employee or service.
You can add all your’s calendars to website from the Divi module!
Out of stock
Manage meetings from the back office

You can freely manage meetings from the back office.
Accept, decline or modify meetings with your clients.
It’s so simple!
Out of stock
Plugin created especially for Divi from Elegant Themes!
The perfect plugin for your clients who earn money
to provide appointments services!
Divi Swift Booking PRO plugin is the best-in-class meeting solution for:
Doctors
Make appointments with patients at different working hours.
Psychologists
End of the question about free appointments. You can do everything online.
Hairdressers
Registration for the hairdresser via the website. The perfect solution!
IT specialists
Enrollment for training or marketing consultancy 100% Online.
Mechanics
Do not call asking for a free oil change date. Book your time online.
Anyone who provides services by the hour
You are only limited by your imagination!
Out of stock
Book services in different time frames!
You define the length of your service
and the time of your work yourself
Suppose your client is a hairdresser and works between 10:00 am and 6:00 pm.
The men’s haircut service lasts 25 minutes, after which your client needs a 5 minute break.
DiviSwift Booking PRO will allow you to configure the time for individual services and the time break between them and your client’s working hours!
Such functions allow your client to save time and arrange everything Online!
Help your client focus on earning, not answering phone calls!

Out of stock
Step 1: Before Install
Make sure you have installed and active Divi Theme or Divi Builder!
Step 2: Plugin installation
Download our plugin. Go to the WordPress Admin Control Panel and select
Plugins -> Add New. Upload our plugin: install and activate it.
Step 3: Your first calendar
After successful installation of DiviSwift Booking Pro, a new menu called “DiviSwift Booking” will appear in the WordPress administration panel.
Click the “DiviSwift Booking” menu, and “add new calendar” (make sure you are
in “Calendars” submenu (menu on the left) ).
This is where you specify the name of the calendar.
Ideally if the name should describe the name of the service, e.g. Men’s haircut.
Now enter a name for the calendar (or service name), assign it to the selected user and click “Save” button.
Step 4: Setting up meetings
Let’s go back to “Calendars” menu.
Select your’s new calendar and click “Edit” button.
Now we need to set the working hours (e.g. 08:00 AM – 04:00 PM), the time of a single service and a break between services.
You can also specify the number of available places.
Let’s go to the section “Time Slots”.
Select a day of the week, e.g. Monday and click “Add timeslots” button.
Now you can choose to add a Single slot or a Bulk slots.
We prefer Bulk because it creates several slots at the same time. Check for yourself what will be more convenient for you.
In “Title (optional)” you can set service names like: “Quick men’s haircut”.
- “Start time” and “End time” define when you start and finish your work.
- “Time Between” is the length of the service break (eg, a 5-minute restroom break).
- “Appointment Length” specifies the duration of the service, e.g. 55 minutes.
- The last option “… space available” determines how many people can book this term, e.g. one person.
When you have filled all the fields, click “add timeslots“. Then do the same for the rest of the days you work.
Additionally, in the “Custom Fields” section you can add various options to your calendar: eg checkbox, text field and captcha. This is very useful when you need more information from the client.
Remember to click the “Save Custom Fields” button, otherwise the changes will not be saved.
Congratulations! Your first calendar has been created. Time to publish it.
Step 5: Publication and Customization
We created our first calendar. It’s time to publish it on the website.
So let’s go to the page where we will place the calendar and click “Enable Visual Builder“.
Select “+” button (Insert Module). Select “DiviSwift Booking Calendar” from the list.
When you click it, a popup will open. Select your calendar from the “Select calendar” section.
- In “Content” tab – section Background you can set background color or Background Gradient. Next to “Content” tab you will see “Design” tab and four important sections: “Calendar”, “Form and Confirmation”, “Primary button” and “Secondary button”.
- “Calendar” section allows you to select fonts and colors for all your calendar.
- “Form and Confirmation” (to active this visible option you need to click on selected day with the possibility of booking) here you can set colors for mian font, appointment name (if you set it before) and chaos “Confirmation” icon.
- Next sections are “Primary” and “Secondary” button’s. Here you can customize “Book Appointment” and “Go back to calendar” buttons.
All customization options are as simple as with the standard Divi module.
Step 6: Pending and Appointments
You have prepared and published your first calendar. It’s time to explain how to manage appointments.
First let’s go back to the WordPress Admin Control Panel and select “DiviSwift Booking” -> “Settings” and select the “General” tab from the left menu.
At the moment, we are only interested in the first three options: “Booking type”, “Booking options” and “Guest Booking Options”. The other options are intended for advanced users and we recommend testing them only in a development environment…
Explanation:
- “Booking type” – allows you to choose whether each or only a registered user can book appointments.
- “Booking options” – allows you to specify whether the person booking the date should provide only the First name, or the First name and Last name. We recommend the First and Last names.
- “Guest Booking Options” – specify whether the user should provide an email address. Recommended for Guest Booking.
… set the above options to your liking, scroll to the bottom of the page and click “Save changes”.
—
When the customer makes a reservation, you will receive an appropriate email
(its content can be edited in the “Emails” tab) and in the WordPress administration panel will also display the relevant information “There is 1 pending appointment. View Pending Appointment”.
You can also make a reservation yourself on your website to see what the process looks like “from the inside”.
When you receive the information described above, go to the WordPress Admin Control panel and select: “DiviSwift Booking” – “Pending” tab to Accept or Decline the meeting with the client.
You can also create and manage appointments from the “Appointments” menu.
Need More?
Our products for Divi Theme
Divi Booking Pro
Elevate your Divi Theme with Divi Booking Pro, the leading solution for managing reservations and appointments.
Divi Ajax Search
Simple and Amazing plugin for Divi Theme by ElegantThemes that allows you to search pages or products in real time.
Divi Ajax Card
Awesome plugin dedicated to Divi theme from ElegantThemes increasing sales conversion.
Do you have any more questions?
Contact us now
The “DiviSwift” brand was created in cooperation with two marketing agencies: Ciekawa Strona and WooBox seo agency in Lublin.
We are happy to answer all your questions.
We work from Monday to Friday,
08:00 am – 04:00 pm GMT + 2.
e-mail: support@diviswift.com
